Access Tokens
Create a personal access token for each script or integration, and edit or revoke it in the console whenever you need to.
Why Use Separate Tokens?
- Gives each client only the scopes it needs.
- Lets you revoke one client without affecting the others.
- Shows which client did what, because the activity log records the token name behind each request.
- Ends temporary access on its own when you set an expiration.
Create a Token
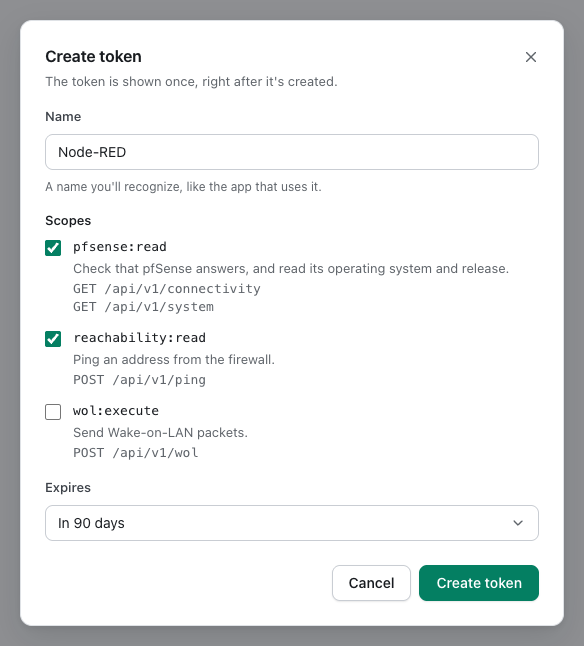
- Open Access tokens and select Create token.
- Enter a Name you'll recognize, like the app that uses it, up to 80 characters. Each token needs its own name, and names that differ only in letter case count as the same.
- Under Scopes, choose what the client can do. Each one lists the paths it opens.
pfsense:read— Connectivity checks and system information.reachability:read— Reachability checks from the firewall.wol:execute— Sending Wake-on-LAN packets.
- Under Expires, choose Never, In 30 days, In 90 days, or In 1 year.
- Select Create token.
Store the Token Once
The new token appears once, at the top of Access tokens, under Token for and its name.
- Select the copy button next to the token, and save the token in the client's secret store.
- Select Done.
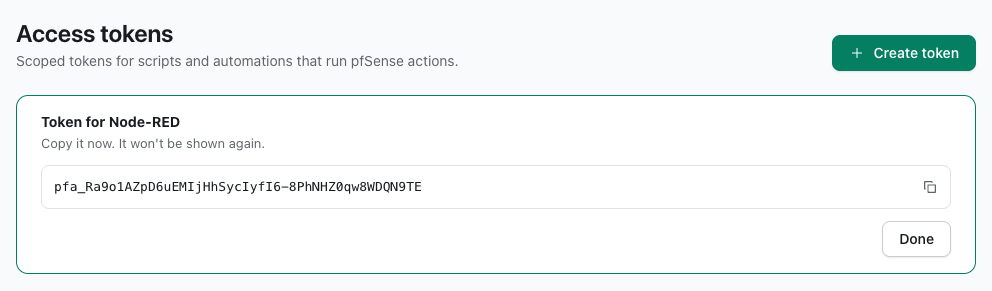
pfSense Actions keeps only a token hash, so a lost token can't be shown again. Create a new token instead and revoke the old one.
Edit a Token
- Edit changes a token's name, scopes, and expiration, and the token's value stays the same. Changes apply to the client's next request.
- Under Expires, the current expiration stays selected as Keep and its date, and Never removes it.
- Events already in the activity log keep the name the token had when they happened.
Revoke a Token
Select Revoke, then Revoke again to confirm. The token is deleted, clients using it are rejected on their next request, and its name becomes free to use again.
Rotate a Token
- Create a replacement with a new name and the same scopes.
- Update the client and check that one request works.
- Revoke the old token.
Expired Tokens
An expired token stays in the list, and requests that use it are rejected. Edit it to set a new expiration, or revoke it.
Calling the API
The Calling the API section shows the address clients call, the Authorization header they send, and each path with the scope it needs. Select the copy button next to Base URL to copy the address the console is open at.
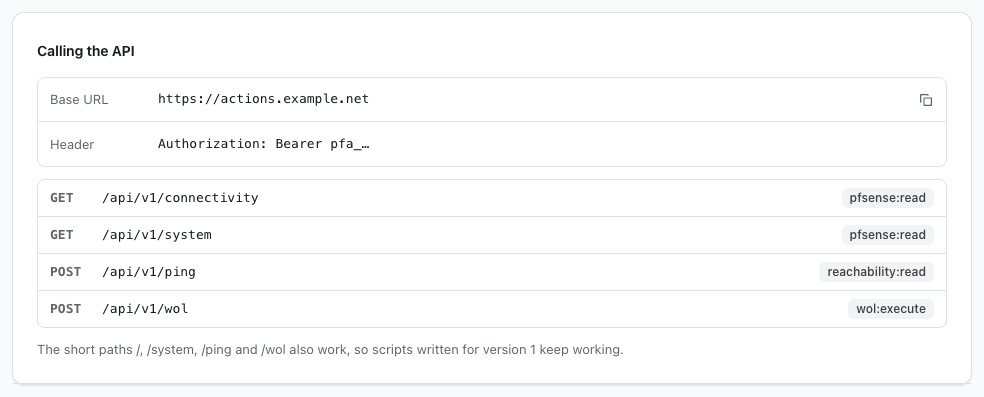
The console's own routes, such as the ones in Manage Notifications from Scripts, need a signed-in browser session, so they answer a token with 403.